Artificial Intelligence (AI) is rapidly changing the way we create content. From generating artwork to producing voiceovers and realistic animations, AI tools have opened endless opportunities for creators. One of the most fascinating applications today is the ability to generate realistic videos of experiences that would otherwise require expensive equipment, training, or even risk-taking—like skydiving.
Whether you are a content creator who wants to tell an adventurous story, a marketer looking for engaging visuals, or just someone curious about the possibilities of AI, this guide will explain how to create a skydiving video using AI—step by step.
Why Create a Skydiving Video with AI?
Before diving into the technical side, let’s first understand the reasons why people might want to use AI for skydiving videos:
- Safety First: Not everyone is ready—or even able—to jump out of a plane. With AI, you can simulate the thrill without the risk.
- Cost Effective: Real skydiving requires aircraft rental, professional instructors, and camera equipment. AI eliminates those expenses.
- Creative Freedom: AI lets you experiment with impossible perspectives—like skydiving on Mars, jumping over futuristic cities, or diving through digital worlds.
- Content Marketing: Businesses can use AI-generated skydiving clips for ads, product launches, or motivational campaigns without arranging a real skydive shoot.
In short, AI puts the thrill of free-fall at your fingertips.
Step 1: Choosing the Right AI Tools
The first step in creating your AI skydiving video is selecting the right set of tools. Different AI platforms specialize in different tasks:
Text-to-Video Generators – Tools like Runway Gen-3, Pika Labs, or Stable Video Diffusion let you describe a scene in words, and they generate video clips.
3D Simulation Software with AI Integration – Programs like Blender (combined with AI plugins) allow you to build more customized, cinematic skydiving sequences.
AI Editing and Enhancement Tools – Software such as Topaz Video Enhance AI, Adobe Premiere Pro with AI features, or Kapwing can polish your video, stabilize motion, and add slow-motion effects.
Voice and Music Generators – Tools like ElevenLabs (for AI voiceover) and AIVA (for AI music) can add narration and background tracks to enhance the storytelling.
Your choice of tools depends on whether you want a quick, simple AI-generated clip or a cinematic, high-quality project.
Step 2: Writing a Creative Prompt
If you’re using text-to-video tools, the prompt is everything. A poorly written prompt may produce generic or unrealistic clips, while a detailed prompt gives you professional-looking results.
For example:
Tips for writing prompts:
Be specific about perspective: first-person POV, drone shot, or cinematic wide-angle.
Weak Prompt: “A person skydiving.”
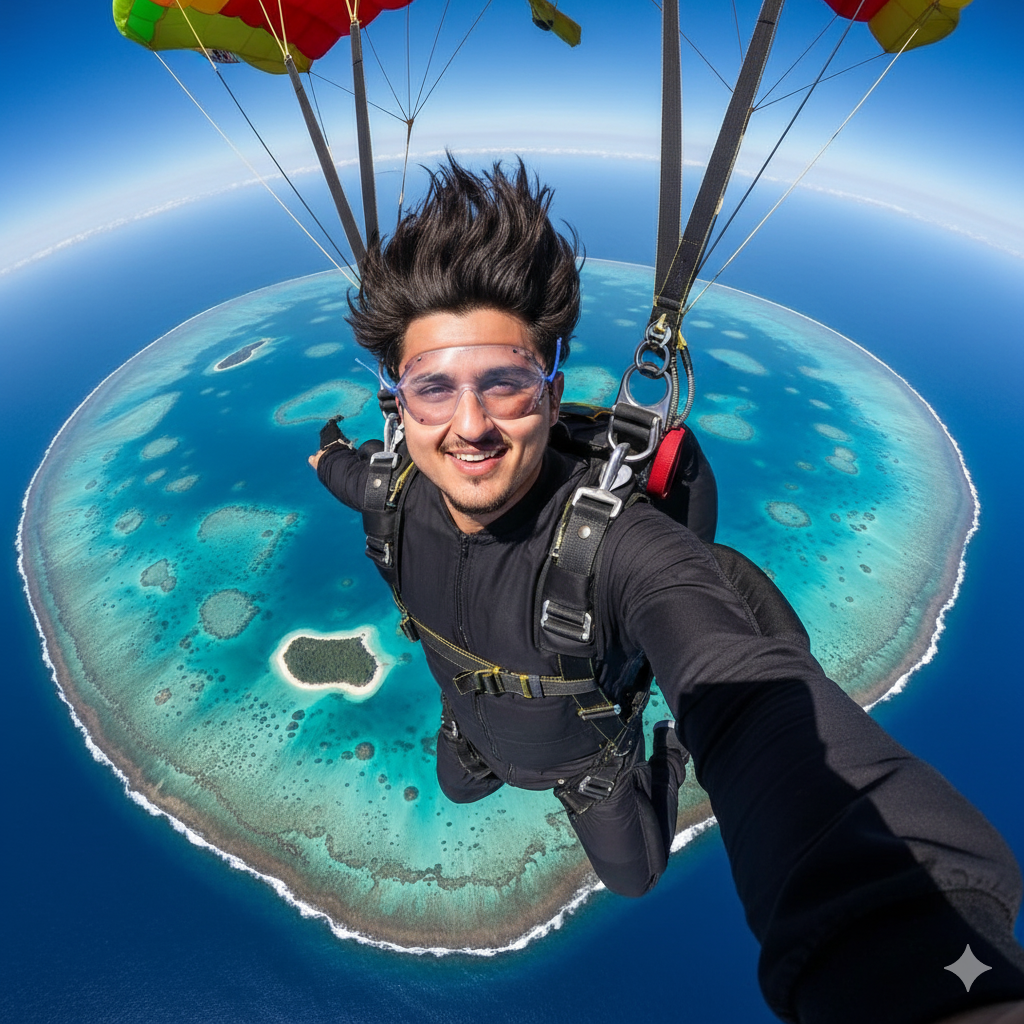
Prompt for photo :Ultra-realistic wide-angle selfie photo of a man (attached photo, 100percent face reserved, 4K quality) skydiving high above the GreatBarrier Reef in Australia. The subject wears a black jumpsuit with secure parachute harness and transparent protective goggles. His hair is blown upward by the wind, expression joyful and excited. The parachute straps and lines are visible above him. Below, the turquoise ocean reveals coral reefs, colorful marine patterns, andsmall tropical islands.
Photo to video:Ultra-realistic cinematic video of the uploaded man (face 100%
preserved, looking exactly like in real life) skydiving high above the Great Barrier Reef, Australia. He is wearing a black jumpsuit with parachute harness and transparent protective goggles. His hair is blown back by the
wind, expression joyful and adventurous, captured on a GoPro-styleC perspective. The video shows him freefalling, adjusting his body mid-air, and spreading his arms with excitement. Below, the turquoise ocean
reveals colorful coral reefs and small tropical islands.
Strong Prompt: “A first-person POV skydiving video above tropical blue waters, realistic camera shake, fast-moving clouds, sunlight reflections on the ocean, cinematic style.”
Describe the environment: mountains, deserts, futuristic city, outer space.
Add camera effects: GoPro style, slow-motion, cinematic lighting, or lens flares.
Mention realism or stylization: photorealistic, cartoon, sci-fi, or surreal.
Step 3: Generating the Initial Video
Once you have your tools and prompt ready:
- Input your prompt into a text-to-video generator.
- Choose the desired resolution (720p, 1080p, or even 4K depending on the platform).
- Adjust clip length—most AI video generators currently produce short clips (3–10 seconds).
- Experiment with multiple generations until you find one that matches your vision.
At this stage, don’t expect a full-length skydive film. Instead, you’ll collect short segments that can later be stitched together.
Step 4: Adding Realism and Details
To make your AI-generated skydiving video more engaging, enhance it with realistic details:
Motion Blur & Camera Shake: Use editing software to add a GoPro-like jitter.
Wind and Atmosphere Effects: Insert audio layers of rushing wind or parachute rustling.
Sky and Ground Views: Combine first-person falling shots with third-person aerial views for variety.
Parachute Opening: Generate an additional clip showing a parachute deploying and smoothly blend it into your video.
These details create the illusion of a continuous, authentic skydive.
Step 5: Editing and Combining Clips
Since AI often generates short clips, you’ll need to combine them in an editor:
- Import all clips into an editing program (Adobe Premiere Pro, DaVinci Resolve, or even CapCut).
- Sequence the clips: start with a plane jump, then free-fall, parachute opening, and landing.
- Use transitions: smooth cuts, fades, or dynamic transitions that mimic the real motion.
- Color grading: enhance sky blues, add cinematic tones, and adjust contrast for a professional finish.
- Overlay HUD Elements: Add altitude meters or speed meters to mimic an action-camera effect.
Step 6: Adding Narration and Music
Every great adventure video needs sound. Here’s how AI can help:
Narration: Use AI voice tools like ElevenLabs to generate a voiceover. Example: “As I leap from the aircraft, the world opens beneath me—an endless sky of freedom.”
Music: Choose AI-generated cinematic tracks from AIVA, Soundraw, or Mubert. Pick adrenaline-pumping beats for free-fall moments and calmer music for the parachute glide.
Sound Effects: Add wind rush, airplane engine noise, and landing thuds from free sound libraries.
Audio will elevate your video from “AI experiment” to “immersive adventure.”
Step 7: Enhancing with AI Post-Production
Even after editing, you can polish the video with AI enhancement tools:
Upscaling & Frame Interpolation: Tools like Topaz Video Enhance AI can convert a 10-second 720p clip into a smooth 4K slow-motion sequence.
Stability Adjustments: AI-based stabilization removes unwanted jitters.
Style Transfer: Apply cinematic filters or stylized effects to match a theme (e.g., futuristic, vintage).
This step ensures your final product looks professional and share-worthy.
Step 8: Exporting and Sharing
Once satisfied, export your video in high quality. Some tips:
Format: MP4 (widely compatible)
Resolution: 1080p or 4K for platforms like YouTube
Aspect Ratio: 16:9 for YouTube, 9:16 for TikTok/Reels
Then share your skydiving adventure online. Since it’s AI-made, consider adding a disclaimer like: “This video was created using AI tools for creative storytelling.” This maintains transparency while showcasing your innovation.
Future Possibilities of AI in Adventure Videos
The current AI tools are just the beginning. Imagine:
Interactive AI Skydives: where viewers choose perspectives in real-time.
VR Experiences: putting on a headset and feeling like you’re actually skydiving.
AI + Motion Capture: blending AI video with real body movement for hyperrealistic results.
In a few years, AI could let anyone experience extreme adventures safely from their living room.
Final Thoughts
Creating a skydiving video with AI is not just about simulating an extreme sport—it’s about pushing creative boundaries. With the right tools, well-crafted prompts, and clever editing, you can make a video that feels thrilling, cinematic, and professional, without ever boarding a plane.
From writing prompts to editing and adding sound effects, the process blends imagination with technology. The result is an inspiring showcase of what AI can achieve in visual storytelling.
So, the next time you dream of skydiving but hesitate at the thought of heights—let AI take the leap for you.