In today’s digital age, creating professional photos for passports, visas, and official documents has become easier than ever. With the IDPhoto & Passport Photo Maker app, you can now generate high-quality, compliant ID photos directly from your smartphone. Whether you’re applying for a passport, visa, job application, or official documentation, this guide will walk you through everything you need to know about creating professional photos using this powerful app.
📸 What is IDPhoto & Passport Photo Maker?
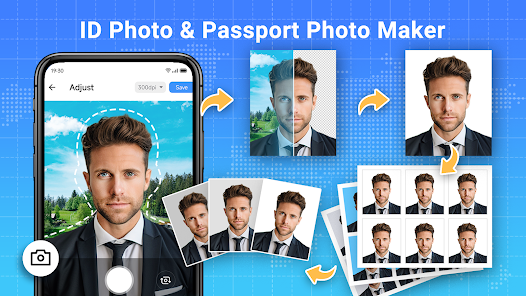
IDPhoto & Passport Photo Maker is a user-friendly mobile application designed to help you create passport-size photos and official ID photos quickly and effortlessly. The app provides photo size templates for more than 150 countries, ensuring your photo meets the official standards.
🔍 Key Features:
- Predefined photo sizes (e.g., 2×2 inches, 35x45mm, etc.)
- AI Background Removal
- Manual adjustment tools for brightness, contrast, and rotation
- Printable layout options
- Multiple ID formats supported (passport, visa, driving license)
🌍 Why Use a Passport Photo Maker App?
Creating passport photos at a professional studio can be time-consuming and expensive. Using an app like IDPhoto & Passport Photo Maker saves you time and money by allowing you to:
- Take unlimited retakes
- Edit and adjust at your convenience
- Print at home or save for later use
📏 How to Create a Professional ID or Passport Photo (Step-by-Step)
Follow these simple steps to create the perfect ID photo using the app:
Step 1: Download and Install the App
Get the IDPhoto & Passport Photo Maker app from the Google Play Store or Apple App Store.
Step 2: Choose the Country & Photo Type
Select the country you are applying for and choose the appropriate photo size (e.g., US Passport, UK Visa, etc.).
Step 3: Capture or Upload a Photo
You can either take a new photo using your phone’s camera or upload an existing one from your gallery. Make sure:
- Your face is clearly visible
- You have a neutral expression
- There are no shadows on the face or background
Step 4: Adjust and Edit
Use the AI background remover to replace the background with white or light grey. Manually adjust the brightness and contrast to enhance quality.
Step 5: Save and Print
Once you’re satisfied, save the image in high-resolution and choose the print layout (like 4×6 photo paper) if you want to print multiple ID photos on one sheet.
🖨️ Printing Tips for Best Results
- Use photo-quality paper for a professional finish
- Set your printer to high-quality mode
- Cut along the lines to get perfect passport-size photos
You can also send the saved image to professional printing services like CVS, Walgreens, or any local photo studio for high-quality prints.
✅ Photo Guidelines for Official Documents
To ensure your ID or passport photo is accepted, follow these general rules:
- Plain white or light background
- Neutral facial expression
- No glasses, hats, or shadows
- High-resolution image (at least 300 DPI)
🔍 SEO Keywords to Rank Better
Here are some high CPC keywords integrated into this blog post:
- Create passport photo online
- ID photo maker app
- Passport photo size guide
- Professional passport photo app
- Free passport photo editor
- Online passport photo tool
- AI background remover for ID photo
🎯 Final Thoughts
Creating professional passport and ID photos no longer requires expensive equipment or trips to a studio. With the IDPhoto & Passport Photo Maker app, anyone can produce high-quality, compliant images right from their phone. Save time, money, and stress while ensuring your photos meet all official standards.
Download
Want more tech tips and app reviews like this? Follow our blog for regular updates on the best mobile tools for productivity and digital convenience.


