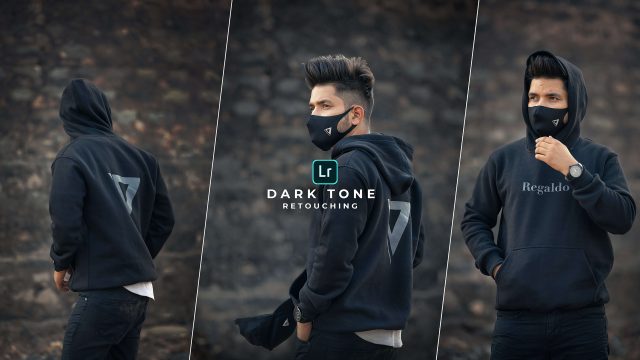
Dark Tone Effect Photo Editing: A Comprehensive Guide to Creating Stunning Visuals
Photo editing has evolved from simple color adjustments to advanced techniques that transform ordinary images into captivating works of art. One such trend gaining massive popularity is dark tone effect photo editing. This style emphasizes rich shadows, muted highlights, and a dramatic ambiance, perfect for creating moody, cinematic, or professional aesthetics. In this article, we’ll explore how to create dark tone effects, the tools you need, and practical tips for achieving stunning results.
What Is the Dark Tone Effect?
The dark tone effect is a photo editing style that highlights deep shadows and reduced brightness, creating a dramatic and moody appearance. It often enhances contrast and introduces subtle color grading to give images an artistic and atmospheric look. This effect is widely used in:
- Portrait photography for a mysterious or elegant feel.
- Landscape photography to emphasize dramatic skies and terrains.
- Product photography to create a premium aesthetic.
- Social media visuals for a cohesive and professional feed.
Why Choose the Dark Tone Effect?
1. Adds Drama to Your Photos
The dark tone effect enhances the visual narrative by creating a sense of mystery and intensity. It draws attention to specific details, making your images stand out.
2. Professional Aesthetic
This style often mimics cinematic lighting and color grading, giving photos a high-quality, polished appearance.
3. Focuses on Key Elements
By reducing distractions in bright areas, the dark tone effect emphasizes the subject and adds depth to the image.
How to Create the Dark Tone Effect
1. Choose the Right Software
Editing tools play a crucial role in achieving the dark tone effect. Some popular options include:
- Adobe Lightroom: Excellent for precise color grading and contrast adjustments.
- Photoshop: Offers advanced layering and masking for detailed edits.
- Snapseed: A free mobile app with professional-grade editing features.
- CapCut or VN: For video projects incorporating dark tone aesthetics.
2. Adjust Exposure and Contrast
- Lower the exposure to darken the image.
- Increase contrast to define shadows and highlights.
- Ensure the subject remains visible by selectively brightening it if needed.
3. Enhance Shadows and Highlights
- Deepen shadows to create a moody atmosphere.
- Reduce highlights to avoid overly bright areas that detract from the effect.
4. Color Grading
- Introduce cooler tones like blues and greens for a cinematic feel.
- Alternatively, warm tones like orange and red can add a vintage touch.
- Adjust saturation to balance colors and maintain a cohesive look.
5. Use Presets or Filters
- Many photo editing apps offer presets tailored for dark tone effects. These can save time while ensuring professional results.
- Experiment with filters that emphasize shadows and reduce vibrancy.
Step-by-Step Tutorial: Dark Tone Effect in Lightroom
Here’s a simple guide to achieving the dark tone effect using Adobe Lightroom:
- Import Your Photo: Choose a high-resolution image for better editing results.
- Basic Adjustments:
- Reduce exposure slightly to darken the image.
- Increase contrast to add depth.
- Lower highlights and increase shadows for a balanced look.
- Tone Curve:
- Adjust the tone curve to create an “S” shape. This enhances contrast and deepens shadows.
- Color Grading:
- Use the Color Grading panel to add cooler tones to shadows and warmer tones to highlights.
- Reduce overall saturation for a muted color palette.
- Final Touches:
- Apply vignette effects to draw attention to the subject.
- Use selective tools to brighten or sharpen the main subject if necessary.
Practical Tips for Dark Tone Photo Editing
1. Start with Well-Lit Photos
While the dark tone effect emphasizes shadows, starting with a well-lit photo ensures you can control the depth and contrast effectively.
2. Use Layers
If your software supports layers, use them to apply adjustments selectively. This allows you to refine details without affecting the entire image.
3. Experiment with Colors
Dark tone effects don’t mean all-black. Play with muted greens, blues, or browns to add a unique touch to your photos.
4. Be Mindful of Overediting
Overuse of shadows or contrast can make the photo appear unnatural. Always aim for a balanced look.
Best Apps for Dark Tone Photo Editing
1. Adobe Lightroom
Known for its professional-grade tools, Lightroom is perfect for achieving precise dark tone effects.
2. Snapseed
This free app offers features like Curves and Selective Adjustments, ideal for dark tone editing.
3. VSCO
With a range of filters tailored for moody aesthetics, VSCO simplifies the editing process.
4. PicsArt
Great for quick edits and creative overlays that complement dark tone effects.
Conclusion
The dark tone effect is a powerful editing style that can elevate your photos, giving them a dramatic, professional, and visually captivating look. By understanding the techniques and tools involved, you can transform your images into works of art that stand out in today’s competitive visual landscape.
Whether you’re a professional photographer, a social media enthusiast, or someone exploring creative hobbies, mastering the dark tone effect will undoubtedly enhance your editing repertoire. Start experimenting today and let your visuals tell compelling stories


